Temporary Sprinkler System Protection Against an Freeze
When Mother Nature decides to bring freezing temperatures before your sprinkler system has been winterized, there are a few simple steps you can take to help defend against freeze damage to your sprinkler system. Some of the most expensive components in your irrigation system are made of brass and other materials that are very susceptible to damage caused by the expansion of water when it freezes. When performing your winterization service, Spring-Green will use industrial compressors having the capacity to push a large volume of air under high pressure through your irrigation lines to blow out water.
Steps to Help Protect Sprinkler Irrigation System From Freeze
When freezing temperatures arrive before the date of your winterization service appointment, we strongly urge you to take the following preventative actions.
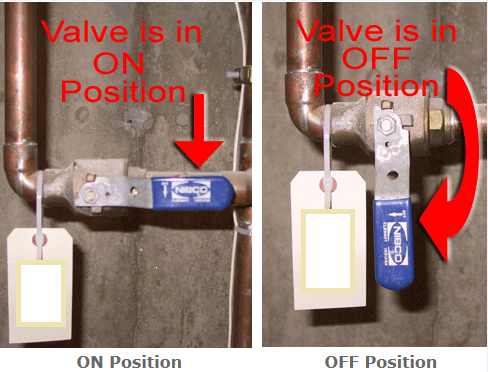
Step 1: Shut off Water supply to Irrigation System A) Locate the shut off valve to the irrigation system. This valve is usually located near your main water meter usually on a pipe that comes off to the side of the main water line. It is a 1” pipe and may be larger than the main water line. You might be able to see it going toward the outside of the house. There should be an orange “spring-green” tag to identify the correct valve. B) Turn the valve a ¼ turn, it will only go one way it may be up down right or left depending on the pipe position. Please check a sink to be sure you have not turned off your main water supply.

Step 2: Unplug Booster Pump (not installed on all systems) If you have a booster pump, it will be located on the floor and have a cord going to an outlet or box. If it's a regular outlet simply remove the plug. If it goes to a box then unplug your controller/timer for the sprinkler system in the garage after you have followed step #3.
Step 3: Run System to Relieve Pressure Go to sprinkler controller/timer (usually located in garage) and turn on any zone to run for 2 minutes. No water will come out of the irrigation head, but it will relieve the pressure in the main line.
Step 4: Open Outside Pipe Outside where the pipe to the irrigation system comes out of the house. Turn the spigot handle (if there is one) attached to this pipe counterclockwise to open it completely.
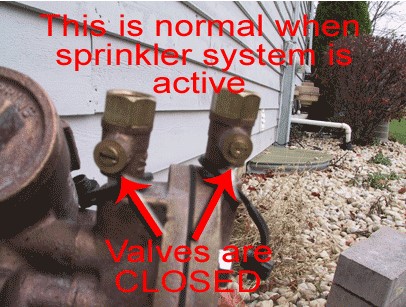
Step 5: Open Outside RPZ Valve If your RPZ valve is outside, locate the mini valves (3 or 4) sticking out of the RPZ that have a groove for a flat head screwdriver (See picture below).

To open the mini valves use a flat head screw driver to turn the screw ¼ turn counter clockwise (See picture below). Water will come out as you open more of these mini valves – this is normal.

Step 6: Schedule Your Appointment for Irrigation Winterization Service The preceding steps are only a temporary precaution and will not substitute for having your irrigation system thoroughly winterized by the professionals at Spring Green.
